This week’s most popular Ask Me Anything questions had a lot to do with business advice. I wish I could pull my husband Shaun aside to weigh in on these for you too, because he is more of a business expert than I, but here are my answers given honestly from the “artist’s” perspective. I think they are very important topics when anyone has the wonderful opportunity to start up their own business these days. It’s important to know what you’re getting into, and be prepared to do some math!
From Betty: I would also like to know how you did the step from photography as a hobby (while being a teacher) to photographing for living and what setup you started off with. What are must have’s and what do you think are classic problems to overcome at the beginning? Many thanks.
Believe it or not, I never in a million years intended to own a photography studio. As a teacher, I did take portraits on the side for fun. I always wanted to do more with my own artwork and often thought about going into graphic design. So when I started out taking photography jobs, my intention was really just to maybe make a little grocery money (totally cliche, I know). My business took off on it’s own, mostly through referrals, and I was stumbling to keep up with it. Because I never set out to be a portrait studio, I really didn’t start off with a strong business plan. In the past 3 years of rapid growth, I’ve learned that I would have saved a lot of sleepless nights having had treated it like a business first. My first recommendation is to open a business account and keep all business money and spending separate. My husband was a banker, so he made sure I did that before I even took my first official photo. Register your business with the state and insure yourself and your equipment. I was good up until this point, and next is where I wish I had done things differently! Figure out what your monthly overhead will be for business expenses, equipment maintenance, storage needs, website hosting etc. Then determine how many hours you will need to put into each session for shooting and editing and how many sessions you can feasibly handle each month. Don’t forget to allot time for session sales, meeting with clients, continued marketing, order consultations, order design and fulfillment, packaging and shipping etc. Those are all time consuming things that go into each and every session on the back end. Calculate what travel and gas will cost too. Join PPA and take advantage of their business and pricing models. They have some very useful formulas for calculating the cost of what goes into a single print, and no, it isn’t just the cost of the paper! Every business has a different operating cost depending on overhead and number of employees, but sorting all of it out and determining what you need to make for each session in order to pay yourself at least minimum wage is the absolute best advice I can give you when starting out. There are lots of amazing photographers who go out of business (in fact I remember reading a statistic when I was starting out that said 80% of photographers are out of business within 2 years, and 90% within 4 years) because they don’t pay attention to the business as much as they pay attention to the pictures. I also know MANY moms who have started businesses of all sorts to make a little cash on the side while they are home with their kids. Every single one of them has remarked to me at one time or another, “I never imagined how much work this would be, I never even see my kids anymore!” I remember feeling like that for a while until Shaun and I made an effort to pay attention to the business first and foremost. Making a living at anything on your own takes a lot of long hours with little pay, especially in the first few years.
As for what set up I started with, I had a my Nikon d700 with a 24-70mm lens and a portable backdrop stand. I borrowed the money from my mom and my plan was to pay it back in the first year. I paid it all back after 2 months in business :0) I started right off with newborn photography so I also had a bean bag from target and some neutral blankets that I traveled to clients houses with. That was it! Over the years I’ve gradually added to my props and equipment as my finances have allowed. Shaun keeps me on a tight budget!
From Jess: I really want to start my own business (not even remotely artistic-related) but am concerned about finances. Did you have a lot of start-up capital? How did you build Heidi Hope Photography into what it is today? Were strategic alliances with other complementary businesses (like Sweet Indulgence) something you planned on or did it just fall into place? Thank you! 🙂
Yikes! This is the wrong answer, but I had no start up capital. Like I said above though, I would do things differently with hindsight. I borrowed the money from my mom to buy my camera and my goal was just to pay it back in the first year. I was on maternity leave from teaching, and wasn’t reliant on the income. I expanded my business only as the demand presented itself. Once I was making enough money each month to pay myself and clear rent, and had 5 months of solid bookings up ahead, I knew it was time to open a studio to save on traveling time and expense and take on more clients. I would have never opened a studio without already having a steady income that cleared the overhead. Once we got to the point where we were turning business away because our hands were full, we knew it was time to hire an employee, and then two. I never grew the business in any respect until I already had the demand… except in the case of buying my first camera! The business often led and I followed. I did spend a lot of time building my web presence through blogging and social media which I think is a huge reason we grew so fast. You can have great work or a great product, but if you can’t market it, and no one sees it, it will never be a profitable business. To be honest, I don’t have a ton of business alliances besides Sweet Indulgence. My mom actually introduced us and we loved each-others work and style, so it was a perfect match. Plus we are right up the street from each other, and both have young families, so it is an easy relationship! I would love to have more relationships with small businesses, but that takes time to build and nurture and usually I’m juggling shooting a sold out studio schedule and my family and it doesn’t leave much time for networking. I do think networking is more important in some businesses than others. For example, vendors in the wedding industry do a ton of networking with each other because much of the business is referral based. If you have the time to do it, go introduce yourself and your work and see if you click. If we ever slow down I will surely be out there introducing myself to other business owners!
From Jeanne: Suggestions on setting up the best indoor natural light studio..as many details as possible. 🙂 Also, actions or photoshop tips to create that light and airy feel.
Ok, two parts here. Both loaded questions!
First, for the studio, there is so much personal preference in setting up the space where you create and display your work. The #1, most important factor for a natural light studio is THE LIGHT. I think most of you would laugh if you saw where our studio is. I’m wedged between a Chineese food resturaunt and an old-school hair salon. Between perms and eggrolls, we never know what we’re smelling. We have a space much too small for us and all of our props. The place used to be a Curves Gym with purple carpets and pink walls. The bathroom is smaller than an average closet. I’m not trying to throw our studio under the bus or anything, but I wouldn’t call myself an expert in setting up a studio. I still have a dream to save up for a gorgeous stand-alone studio on a beautiful wooded lot with a laundry list of amenities…. but that’s a long way away! What I’m saying is that the space you set up doesn’t matter much at all to your final product except that you MUST have good light.
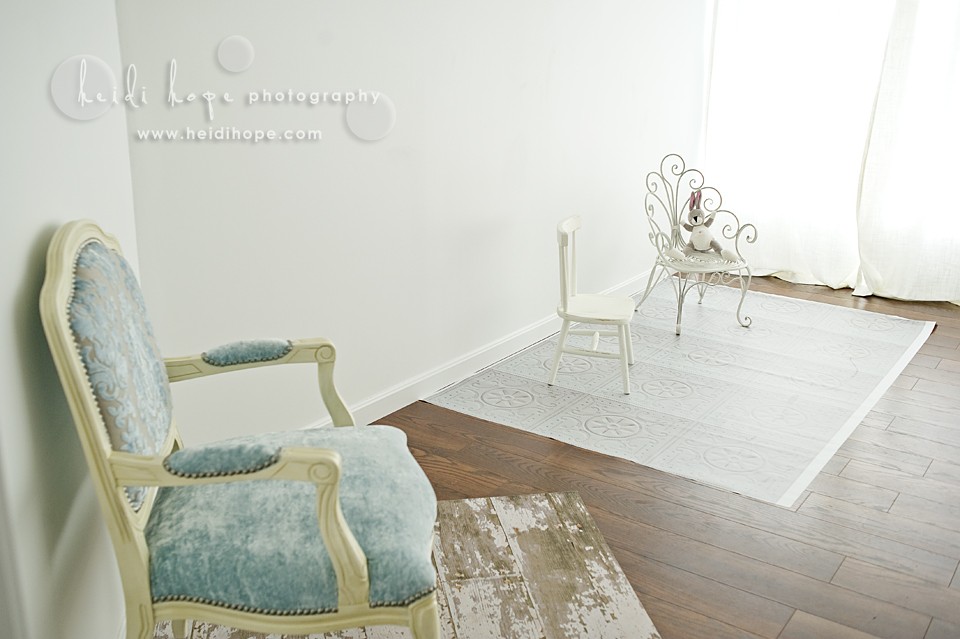
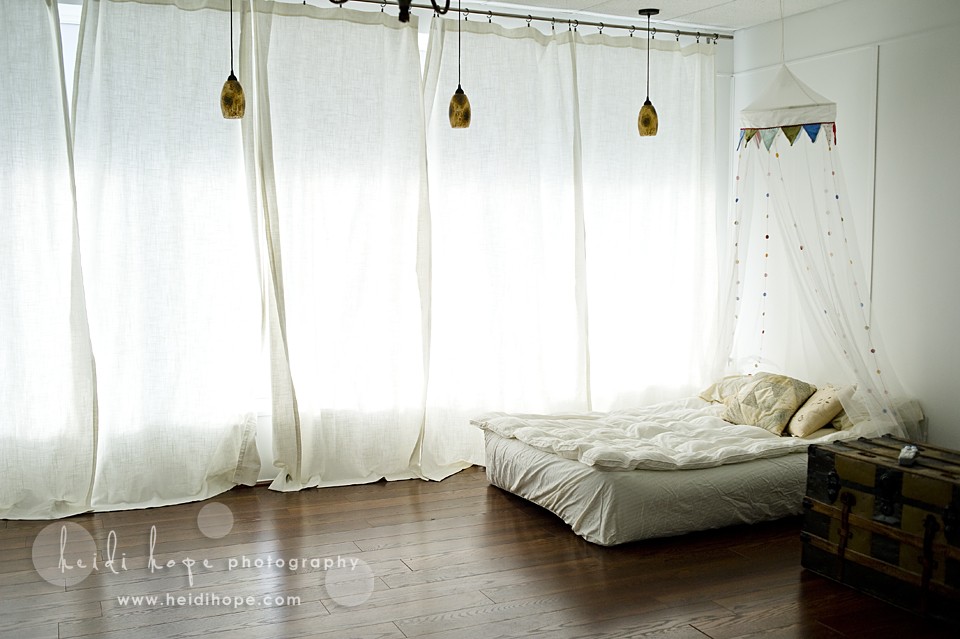
We have south facing windows that have a white film on them to diffuse the light. We get great direct light all day that I can soften with the film and white curtains if neccessary. So the light is number one. After that, get yourself a backdrop stand, some rolls of paper or cloth backdrops, a reflector, and you’re good to go in my opinion! That is truly all I started with. Props and decor are all to taste of course, and I gathered all of my chairs and baskets over the years as I found them. I think it’s important to have samples of your work and products on hand to show clients when they come in. Here’s two quick shots of my shooting room which is around 300 square feet, taken last January with a wide-angle lens.
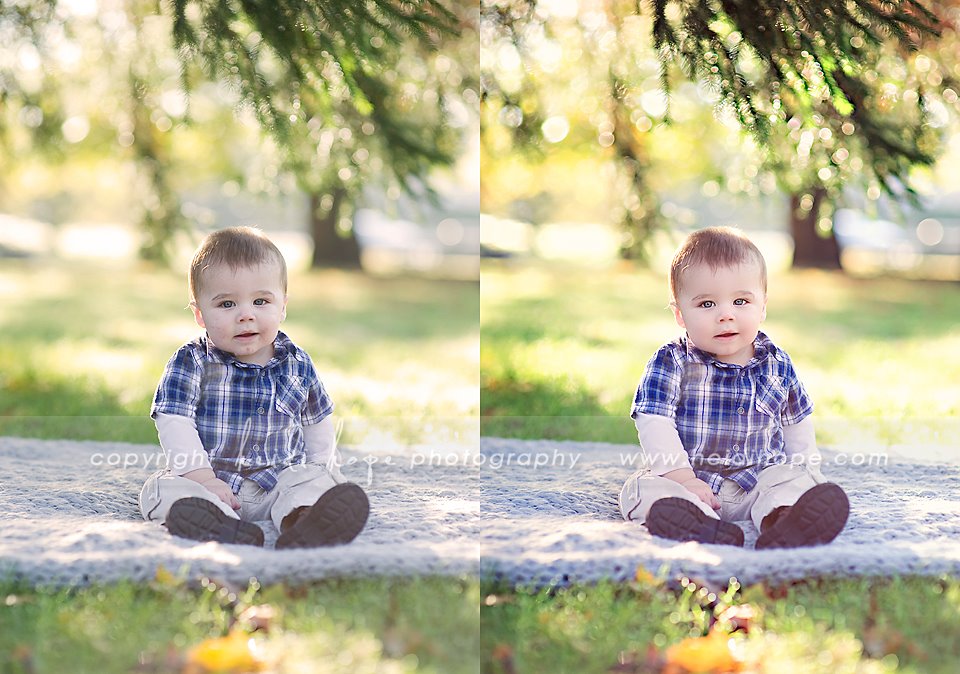
As for photoshop tips, I’m sorry to say this is one thing I can’t answer in a single blog post. I’ve spent years teaching and learning photoshop. My style of processing is constantly changing (I’m sure much to the dismay of my editor who I probably drive nuts saying “I tried this thing out today and I think it looks really cool!”). There is no easy answer. Sometimes I look at another photographer and think “I wish I knew how they did that” too. I’ve had other photographers take a full day photoshop workshop with me and they almost always want me to offer a part 2 and part 3 because they could just keep learning more. You have to practice and practice and develop your own style. Take some photoshop workshops or classes at a community college. The more you know the program by heart, the more tools you’ll have at your fingertips to achieve the look you envision. One thing that does help with that light, airy look is shooting manually, slightly overexposing and increasing the midtones through levels and curves in photoshop. I do that to almost every image. Shooting with soft even light on your subject is also very important. I have every possible action out there. Name it and I probably have it. I play with them all constantly for my own fun and sometimes they look good, sometimes they don’t. When I’m in the mood for one, I apply it at an extremely low opacity and tweak each layer so that it fits the particular image I’m working on. Lately I’ve been playing with Oh So Posh actions on my outdoor work and love the vibrant colors! Here’s a before and after with her actions lightly applied on top of my usual editing:
From Jamie : Which MacBook Pro is best for what we do but reasonably (if there is such a thing) priced 🙂 Lots of photoshop editing and running actions – need something quick!
I bought a MacBook Pro over 6 years ago, and I no longer use it, so I’m definitely not a great resource for that! I’m sorry!
From many people: How do you ensure such a sharp, clear focus on the eyes? Do you have a favorite setting? How do you get those eyes looking so crystal and shiny?
I somewhat answered this last week, but I know no one believes me!! It is all about light and focus. I manually focus much of the time and I usually shoot around f/2 for a shallow depth of field. It’s also important to get a catch light in the subject’s eyes for that sparkle. I’ll copy some of what I explained last week along with an example to prove to you that I’m telling the truth! This is an image that was handy on my desktop from a session 2 weeks ago.
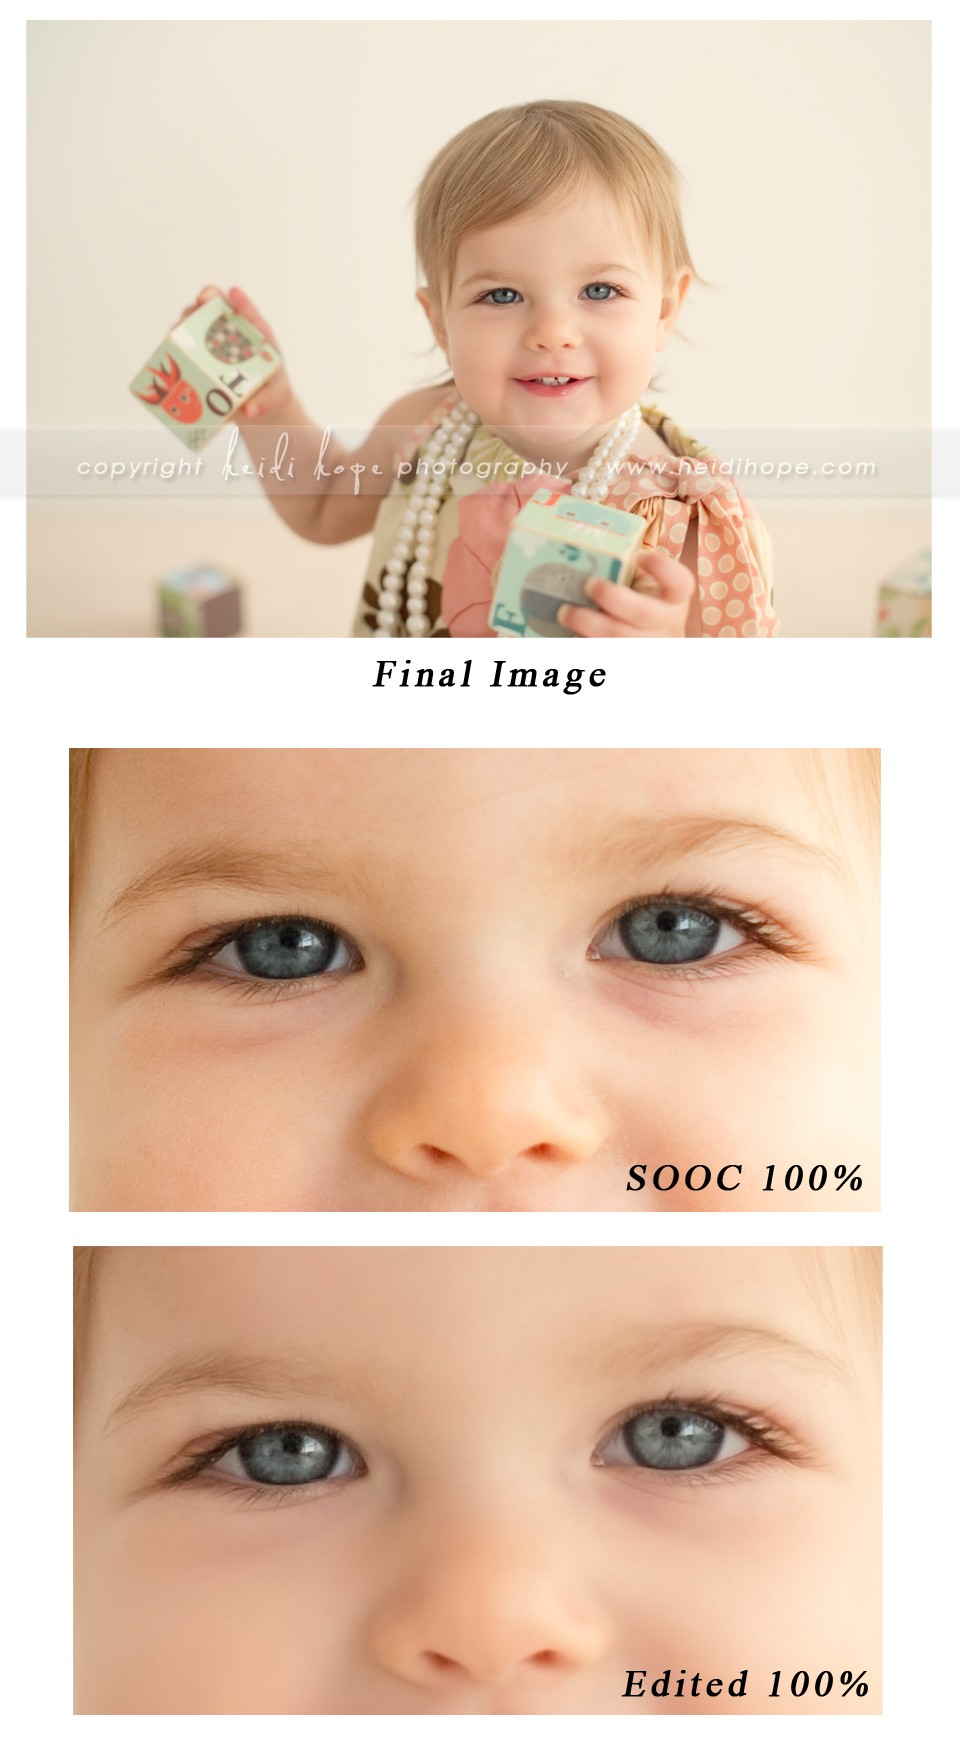 This image was a bit noisy at 100% because it was shot at ISO 500, f/2.2, 1/400s with my 50mm 1.4 lens. I wanted to keep the shutter speed as fast as I could and not shoot completely wide open because this little girl was 1 and all over exploring the studio! Also, my light changes as clouds roll over and I expose manually so the SOOC was slightly dark and I increased the exposure a bit in ACR as shown in the SOOC version above… also contributing to noise. You’ll notice that my edited version is actually LESS sharp than straight out of camera (sooc) because I ran a noise reduction filter and softened the blacks a bit. Also, the top is a screen shot of the RAW (uncompressed) and the final is a screen shot of the JPEG (compressed) which also causes some loss. The point in showing you these is to say “SEE, you have to have sharp eyes to begin with!” To edit this image I reduced noise, recovered the highlights, played with color balance to reduce yellow, increased the midtones (which lightens the iris slightly) with levels, reduced the skin saturation with selective color, retouched the skin and ran an unsharp mask filter to bring some sharpness back after reducing noise. Another trick I sometimes use is to burn back the lash line if the contrast becomes washed out due to the midtone adjustment.
Here is more information on achieving sharp eyes from last week:
For the brightness of the eyes, it is a combination of proper light and focus. First, again, lighting is the most important factor. Photography is an artform completely dependent upon light. Finding good light should be the number one preparation for the shoot. You can have the most amazing set or natural background and photogenic subject with perfect wardrobe, and if it is improperly lit, it will all turn out looking amateur. Light is usually the difference between a WOW image and an okay image. I am still studying light, and will likely never stop! So, yes, make sure the subject’s eyes are properly lit whenever possible (I know it is tough with a toddler on the move). I try to get my subjects to look towards the light so the light fills their eyes or use a reflector to bounce some catch lights in. Second comes focus. I manually focus about 80% of the time now because I am such a stickler about eyes in focus and I shoot wide open. I don’t just want things to look good online (in fact looking good online is secondary), I want it to look amazing if it is blown up to a 30×40 canvas hanging in my clients home! Anything with soft eyes generally gets trashed unless it is an image I absolutely can’t part with. The quality of the lens also plays a big role in overall sharpness, which is why I shoot with high quality prime lenses. Getting the eyes in perfect focus adds that “sparkle” that often gets commented on in my photos. After the shoot, I use photoshop to airbrush skin and sharpen the overall image and eyes even more using the unsharp mask filter and layer masks.
From Annemarie: When you first started out did your business grow mainly from word of mouth or a specific way of advertising?
I didn’t pay $1 in advertising until my 2nd year in business. The first year was solely my website and word of mouth/referrals. Now we do a few select print ads, but I still think that building your web presence through social media and blogging is the most valuable use of your resources. Now the majority of our business is from return clients, referrals from clients, and people who find our website on google.
I hope you all found these answers helpful! I won’t be doing one of these posts next week because my schedule is too tight but will continue to take questions on facebook for the post the following week, so head on over and visit us there :0) Have a great week and happy shooting (and number-crunching)!

Very valuable info! Thank you.
You are seriously amazing and what you do and a huge inspiration to me (have been for over a year now). My schedule is so tight as well as my photography business has taken off and I often find myself working 60+ hours between shooting and editing. I just don’t even know how you find the time in your schedule to answer these questions and help others. Every day I find you more amazing! Thanks for all the tips, Heidi!
Everyday you amaze me more and more. You’re a huge inspiration for me (have been for over a year now) and I can’t even fathom how you have found the time to answer these questions and help others with such a busy schedule. My business has taken off over the last year as well and between shooting and editing 60+ hours a week I just can’t figure out how you do it. Thanks for all the business advice. AWESOME advice on the financial aspect as well!
*eek, sorry, didn’t mean to post twice!
It is so generous to share your valuable knowledge. Many wouldn’t do it (particularly so freely).
It’s great to know how you started and that if it’s what you want, you can acheive it.
I can’t wait for more “ask me anything.”
All the way from Oz
Thank you. Thank you. Thank you!!!! What a wonderful gift to all of us Heidi Hope wanna be’s! I love your work and love the fact that you are sharing with us when so many try to keep it all a big secret. Your openness and knowledge that you are sharing is so appreciated! Thank you! It is like early Christmas!
Just discovered you on Etsy….amazing advice you have and your photography is stunning!
Hi Heidi,
I have been quietly admiring your work for sometime now, you are amazing!! Thank you so much for sharing your secrets! 🙂